Monday, September 29, 2014

Cardboard into spooky wood planks


So the theme for the outside of our house is zombies. I thought it would be cool to have our house look like it was boarded up. So of course I'm not actually going to go get wood and board my house up. So I came up with another way. 
Here what you'll need: 

1) Cardboard ( we moved so we had cardboard boxes left) you can purchase cardboard boxes at Home Depot or Lowe's, you can also ask your local grocery store for some for free.

2) Brown, black, white paint ( Red paint is optional if you're going for paint splatters or keep out) you can purchase craft paint at Walmart, Michael's, or Hobby Lobby, are usually under a dollar. 


3) paint brush and paint sponges( The different types and sizes give the fact that would has) you can purchase paint sponges and brushes at Walmart, Michael's or hobby lobby.

Let's get started
Start by picking how dark or light you want the wood base color to be. Simply take your break and either add more black or white. I decided I like the original brown color I had and didn't add anything. After painting it all brown you then go in with a darker brown color adding in lines for the grain of the wood, add a few strokes of black for shadowing. I then painted all around the  cardboard edges black to help it stand out more. At the end I had this. 

Of course one came out better than the other. Doesn't it always. 

Next I went outside for this part. I added blood for the creepy affect. Get a cup of water and dip your clean paintbrush in it and then dip it in the red paint, I chose a deep red. You then want to flick the paintbrush on to the cardboard to mimic paint splatters. The more wet your paintbrush is the better. I went outside because this part got really messy and everywhere. After you should end up with something like this. 
And remember it doesn't have to be perfect the more unprotected is the better. 

After the paint dried by then used scotch brand mounting tape, this is a foam tape that is double sided sticky. I purchased mine at target for about three dollars. And I used it everywhere throughout my house and outside for hollowing decorations.
This is how I displayed my keep out bloody wood planks signs. 
At night, The paper zombie as purchase at the $.98 store and I use Scott's mounting tape to keep it in place

During the day, The bloody footprints stickers were purchased at dollar tree.

Hope you enjoyed, happy hunting. 


Saturday, September 20, 2014

Fall candle jars


I Love those Mason jars with fall leaves but unfortunately we have no fall leaves so I improvised. I went to hobby lobby found this awesome fall leaves scrapbooking paper it was only $.59. I also got mod podge, and Orange crafting  paint. I used an Old spaghetti jar I washed out tell it was clean and dry. After I painted the top and bottom of the mason jar orange but you can use any color you desire or skip the step altogether. I then measured the middle of the jar and cut a strip of the scrap paper out and put the glue on the glass jar then carefully placing the scrap paper over the glue to sell it you put much podge glue over the whole entire jar the painted area and the scrappaper area and let dry. I had some leaf cut outs so I also placed those on the top of the jar and tied a ribbon around this part is optional,  just get creative there is no wrong way. Place two LED lights in the jar and enjoy. 


Wednesday, September 3, 2014

DIY HALLOWEEN POTION BOTTLES


Okay let's be real who doesn't love potion bottles even if there not real, it's always fun to pretend and that's what Halloween is all about being something someone you're not.  So this year we're getting extra creative but we're on a budget like most people so were going to use a lot of things we either have around or you can purchase at the dollar store or your local craft store. So to get started here are the things you'll need.
1) your choice of jars or plastic bottles, I used both. Here are the bottles two of which have water and food coloring in them. 

2) Food color of your choice and or shampoo or dish soap. 

3) Label for your bottles. I chose scrapbooking paper I purchased at hobby lobby for $.59

4) mod podge, you can pretty much purchased this at Walmart or your local craft store. 
Goo gone is great for cleaning the old glue from previous labels. 

5) get creative this part is up to you to add any additional crafts to your bottles. I used Moss, plastic spiders, that I purchased at the dollar store, I also used hot glue and dark red acrylic paint.
 
So first thing first wash all your bottles and let them dry. If any sticky residue from the last labels you can use goo gone. Nexts choose your label, if you're using scrapbooking paper then it's time to pick and cut. Once you cut out or chose your label position the label over your bottle and find a perfect spot. Now pull out your much podge, apply the much podge to the back of your label and paste then apply the mosh posh over your label to sell it. If you are done you can add food coloring and water. If not get creative. I used moss over one of the bottle and a round the label on another. Hot glue works best for applying the moss. I also play spiders in the Moss and in one of the small bottles. For the other bottle I used hot glue and let it drip all around the rim and down the bottle. After the hot glue dried which only takes seconds I then took dark red acrylic paint and a brush and painted over the hot glue to make it look like blood dripping. Can fill the bottles with spiders, bugs, glitter anything that will fit and you like. Once you're done decorating your bottle it is now time to fill it with your choice of liquid. For two bottles I chose water and food coloring. For the two small ones I chose not to fill one and the other one I put spiders and clear shampoo. 
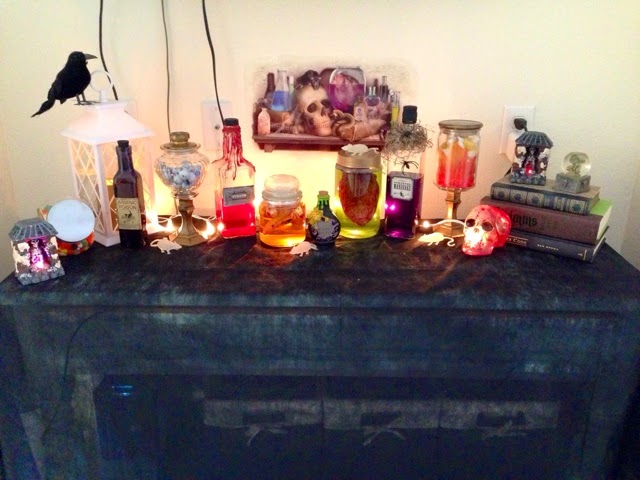


After you're done it's time for you to display your creation. I displayed these with Dollar store Halloween items and my other DIY Halloween projects like the organ jars and candy jars. 


Hope you enjoy and this helps inspire you to get creative this year for Halloween. Happy tricks and treats. 


Tuesday, September 2, 2014

DIY Dollar store Candy Jar


I love collecting jars and putting little things in them. Some hold holiday candy others tea, popcorn kernels, and even Cotten balls the possibilities are endless. I came a cross a picture of cute candy jars on Pinterest when looking up fall crafts and right then I knew I was going to do this. This DIY doesn't take much at all. Here's what you'll need and in my case already had on hand. 
Things you'll need:
1) Your Choice of jar. I use one old candel jar and one candy jar I got last Christmas from the dollar store. 

2) dollar stor candel stick holders 

3) E6000 glue, I got mine at target and even Walmart carries it for about $4 - $6 dollars. It's worth it because a little goes a long way.

4) Any spray paint of your Choice I went with gold and Crystal Clear Spray Paint to protect the finish. 

5) Optional black acrylic craft paint and paint brush. I use this to make it look worn and aged. 


Directions:
1) wash the jars and candel sick holders with soap and warm water. Then let complete dry. 

2) This is where you get creative. It's time to paint. In a well ventilated area spray paint two coats of color on to the candel stick and the top of the lids. Let dry in the two in the coats. 

3) This step is optional I use a light hand and brush black on to the edges. Let paint dry, this takes no time at all. Acrylic paint dries quickly.

4) You then want to spay the Crystal clear spray paint oven the color pices. Follow the directions on the spay paint. I ues to light coats. After again set a side and let dry. About a hour or more. 

5) Assemble, take the glue and put it all around the rim of the candlestick holder then place in the middle of the bottom of the jar. Put aside and let it dry over night. 

By morning it will be ready for you to fill with whatever you choose. I'm currently useing mind for halloween sweet treats for my kids. 

Here is how I display mind.
Hope you enjoyed and have a wonderful holiday. 


Friday, August 29, 2014

DIY Organs in a jar


Fall is finally here witch means Halloween is around the corner. I love Halloween dressing up being creative getting candy what's not to love. Last year we didn't have a lot of money to decorate so a lot of our decorations came from the dollar stores. They are always okay but not great. Since my kids are getting older I need to step up my game on decorations. I of course kept all my dollar store HalloweenDecor from last year but I didn't want to use them this year the way they were. So I have found a few creative things to do with dollar store Halloween decorations.
Here's the first one, hope you enjoy. 
Things you will need:
1) Dollar store body organs( Brain, heart, eyes, fingers ect. )

2) Empty jars ( I used an old candle jar and peanut butter jar basically anything you have lying around)

3) Your choice of food coloring and water or ( optional you can use shampoo or dish soap for a slime effect)

Directions: 
First peal off the label with warm water and wash the jar with soap and water. If there is any sticky residue you can use goo be gone I purchased my in the dollar section in Target for only a dollar. Next its time to decide witch Organ for witch jar after put aside the organ. Now it's time for the food coloring and water. Start with half a jar full of water and then add you color get creative. My sons help for this part they added in colors tell they love it. We ended up haveing one bright green and a dark orange. It is now time to put the organ in the jar and fill the rest with water and close the lid. [ if you decided to use shampoo or dish soap you put the organ in the jar first and then pour your desired soap in the jar until full or your desired look] 
note: I tried the soap method first and found it dissolve the paint off the organ. It wasn't the look I was going for so switched to water. 


I spray-painted the top of the peanut butter jar gold to give it a richer look.

Here is the final result. Everything here was either purchased at the dollar store or I Already had on hand such as glass bottles. 
Hope you enjoy. For more Halloween DIY check out my other blogs on dollar store candy jars and potion bottles.